For any issues with this software or documentation, please open an SDCC RT Ticket in the StorageManagement category.
The BNL Box service is based on Nextcloud and can be accessed via web browser and via desktop and mobile apps. In some cases, users may also need to transfer data in and out of BNL Box using the unix command line. This article describes how to do this via webdav using a custom script, as well as other standard utilities.
| Info |
|---|
Please note: The commonly used command “wget” is not known to work with this webdav interface. The applications described below have all been tested for compatibility. |
FIRST STEP: Setting up WebDAV access to your account
| Info |
|---|
Please Note: If you are accessing BNL Box through a guest account, you can skip this setup. Your guest account username and password can be used directly to access the webdav interface. |
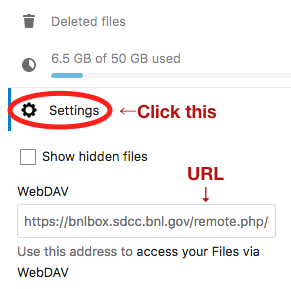
Each account has its own unique WebDAV url based on the account UUID. This URL can be found at any time by selecting “Settings” from within the web browser main interface, at the bottom of the left hand sidebar:
While this URL is unique, it is possible to create multiple App username/password pairs for a given BNLBox account. This simplifies access revocation and makes it possible to identify different connections.
The procedure to create a new App username/password pair is as follows:
From the main web browser page, select the user profile icon on the upper right hand side.
From the drop down menu, select “Settings” to get to the user settings page.
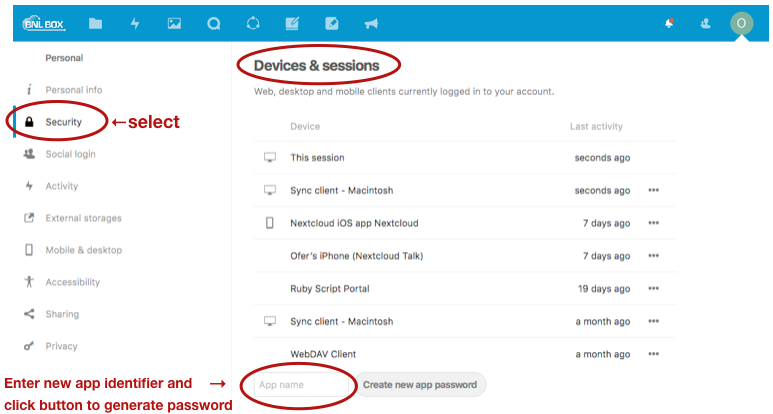
From the User Settings page, select “Security” from the menu panel on the left hand side of the page.
Go to the “Devices and Sessions” section at the bottom of the page and, in the box containing the text “App Name,” enter a name of your choice to identify this username/password pair, then click "Create new app password".
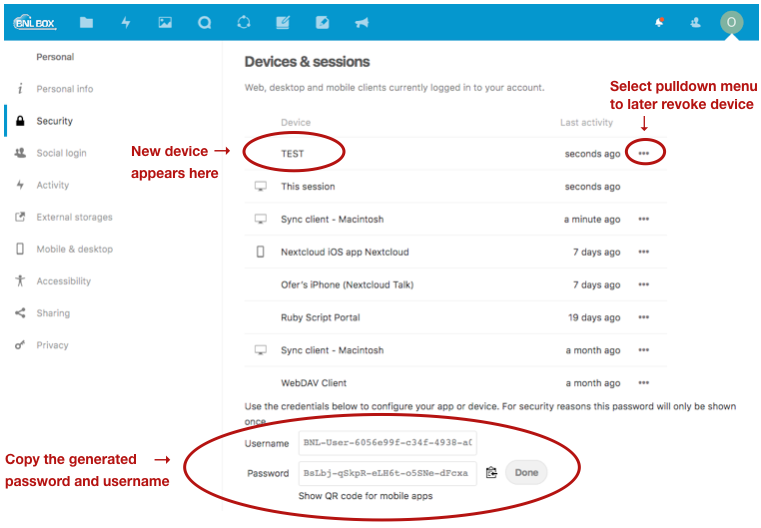
The “Create new app password” button will be replaced with boxes containing the username and system generated App password. Copy the username and password. You will also see your new “Device” listed in the table above.
| Info |
|---|
Note that the password generated for a given App name cannot be retrieved later. If you lose this password, you will need to repeat this process to generate a new one. |
Using the custom BNL Box copy tool
We have developed a custom command-line copy tool, copy_bnl_box.rb, that is available in every BNL Box user’s home directory. It can also be downloaded here (pwd: copybnlbox). After downloading the tool, please do the following:
Make sure the script is set to be executable:
Code Block language bash chmod a+x copy_bnl_box.rb
Create the file $HOME/.bnlbox with two lines as follows:
Code Block language bash user:<username> pwd:<password>
where <username> and <password> are replaced by the specific App username/password pair you created in the setup steps above (or your guest account username and password, if you are accessing BNL Box through a guest account).
Make sure the file permissions are set to 600
Code Block language bash chmod 600 $HOME/.bnlbox
You are now ready to use the copy tool. There is no need to type your username/password as those will be read from the .bnlbox file. Be sure to safeguard this file as it allows full access to your BNL Box account.
Your home directory is addressed by prepending “box:” to the path. This prefix conveniently replaces your personal WebDAV URL. Some basic usage information is shown below.
To read a file from BNL Box:
| Code Block | ||
|---|---|---|
| ||
copy_bnl_box.rb box:/<dir>/<filename> <filename> |
To copy a file into BNL Box:
| Code Block | ||
|---|---|---|
| ||
copy_bnl_box.rb <filename> box:/<dir>/filename |
Full directory trees can also be copied. The help option provides the following information:
| Code Block | ||
|---|---|---|
| ||
Usage: copy_bnl_box.rb [options] source destination
NOTE: to specify the bnlbox storage, you need to prepend 'box:'
to your path seen in your bnl box service
    -h, --help                       Display help message
    -s, --https_proxy ProxyHost      Set https proxy
    -r, --url URL                    Set none-default url
    -p, --password password          Set User Password
    -u, --username username          Set User Name
    -f, --file filename              Configuration File
    -v, --verbose                    Verbose messages
-d, --debug Debug option |
Other command line copy tools
cURL and cadaverare two readily available tools that can be used to access a BNLBox Account from a Linux command line. For transferring single files into or out of BNLBox, cURL is the simpler tool while cadaver is a better tool for more complex interactions. In the instructions below, WebDAVURL and username:password refer to the setup in the FIRST STEP noted above.
Using cURL
Downloading a file
To download the file named SrcFileName from BNLBox using cURL, use the following command:
| Code Block | ||
|---|---|---|
| ||
curl -u username:password WebDAVURL/SrcFileName –output DestFileName |
where username and password are the App username and password that were previously generated (or your guest account username and password, if you are accessing BNL Box through a guest account) and WebDAVURL is obviously the WebDAV URL for the account. Note that the name of the file must be specified on the destination side, DestFileName in the above example.
To download a file in a subdirectory in BNLBox, replace SrcFileName in the above curl command with PathName/SrcFileName where PathName is the full path name of the subdirectory.
Uploading a File
To upload the local file named SrcFileName to BNLBox using cURL, use the following command:
| Code Block | ||
|---|---|---|
| ||
curl -u username:password -T SrcFileName WebDAVURL/DestFileName |
where DestFileName is the name of the file in BNLbox, and the other parameters are as described in the downloading example above.
The local file SrcFileName will be placed into the top level directory for the account in the file named DestFileName. Note that the name for the file in BNLBox must be specified.
To put a local file in a subdirectory in BNLBox, replace DestFileName with PathName/DestFileName in the above command, where PathName is the full path name of the subdirectory (starting from the account top level directory). Note that the subdirectory MUST exist for the upload to be successful.
| Info |
|---|
We recommend invoking curl with the “-n” option and using a standard .netrc file, rather than typing the username and password on the command line as illustrated above. |
Additional information about cURL can be found in the curl man pages.
Using cadaver
Although cURL can be used for more complex interactions with BNLBox, a better tool is cadaver. Cadaver provides an interactive, ftp client-like interface to BNLBox. The command is invoked as follows:
| Code Block | ||
|---|---|---|
| ||
cadaver WebDAVURL |
Cadaver will then prompt you for the App username and password (or your guest account username and password, if you are accessing BNL Box through a guest account). Once authenticated, cadaver will display a prompt for commands. Commands include ls, lls, cd, lcd, pwd, lpwd, get, put, mget, mput, delete, logout, and others. Consult the cadaver man pages for the complete list of supported commands.
Related articles
| Filter by label (Content by label) | ||||||||||||||||||
|---|---|---|---|---|---|---|---|---|---|---|---|---|---|---|---|---|---|---|
|
| Page Properties | ||
|---|---|---|
| ||
|